As part of maintaining my blonde hair, washing less frequently has been a necessity, and with that of course, comes finding a way to get rid of grease in between washes. I naturally tend to have oily hair, so dry shampoo has been a product that I've been using for a while. Recently, I feel that I've come across products that have really left an impression on me and obviously, I'd like to share the knowledge!
Osis+ Refresh Dust
This dry shampoo was one of the first salon brands that I tested out and Schwarzkopf as a brand has some really great products, so I expected just as much from their dry shampoo. This particular dry shampoo works best for short-term use (i.e. we are just trying to extend in between a wash or so), but doesn't really do well for heavy duty use (at least not in my hair). Although it isn't my number one, it still is on my top five list mainly because it smells great and it does a great job not leaving a grey-cast in my hair.
AG Hair Simply Dry Dry Shampoo
Ever since trying AG hair products in March, this product has been my ride-or-die. This dry shampoo does an excellent job keeping up with me no matter how long I would like to go in between washes (Which is typically around every three days...maybe four if necessary). Something that I've also noticed is that this is one of those dry shampoos that I don't have to pile on. I can put some on one day and the next day it still has pretty good oil control. As with other AG products, the scent is lovely, and it sprays on without leaving a residue.
Not Your Mother's Clean Freak Dry Shampoo
This product was a recent discovery for me and let me tell you, I was impressed. I picked this up on a whim because I wasn't going to get a chance to make it to a salon store with my sister, so I bought this one at my local Target. This was pretty much the only dry shampoo that I used during SPP, and I thought it worked just as well as my beloved AG Simply Dry. Best part? It was only 5!!! So for the people that want to stay at a drugstore price point, I highly recommend that you try this one as it's probably the best drugstore dry shampoo that I've tried.
Using Dry Shampoo
To get the most out of your dryshampoo, it is best to apply about 4-7 inches away from your scalp and then give it some time to soak in. I typically will apply my dry shampoo and then will go off to do my makeup. When you've given it some time to settle, just use your fingers to work it into your scalp and then massage out the rest. In general, your hair will take some time getting used to not being washed as frequently, but using dry shampoo can help while you are in transition. Over time, your hair will get used to going longer between washes and you won't need to use as much dry shampoo.
So, for the days that you woke up a bit late from your post-all-nighter nap and you don't have a lot of time to wash your hair, dry shampoo can be your best friend. Also, it is a great thing to use to freshen up after hitting the gym, when you don't want to walk out looking a hot mess, in case you run into the cute Histology T.A.
I hope you are having a wonderful start to your week, and I will be talking to you soon!
Part of what came from loving YouTube was an obsession with all things beauty. Through watching many beauty videos and my own exploration with makeup, I've gotten a pretty good sense of what is worth shelling out the cash for and what you can definitely opt drugstore for. In order to put my hours of YouTube watching to good use and justify my countless beauty purchases, I'll break down what I've learned for you!
Foundation
Foundation is definitely a makeup item that I'd say to go ahead and spend the money on. Having a really great quality foundation will create a beautiful base for the rest of your makeup and in general, high-end products will most often have better ingredients. That being said, by no means is drugstore foundation a no-go. I have tried some really great drugstore foundations ( I'm currently testing one out) and if you don't want to spend $30+ on a foundation, going drugstore is a great alternative.
Eyeshadow
For eyeshadow, my consensus is right in the middle. Drugstore eyeshadow can at times be hit or miss as they can sometimes be chalky or lack pigment. But, I think if you are looking to try a color that you've never worn before, it's a great way to get your toes wet. Then, say you did love how bright blue shadow looks on you, you can always go back and find yourself a high-end version. But, if you are thinking of adding a palette to your collection, I'd say try to find yourself a high-end version especially if it's a neutrals palette. With a neutrals palette, you'll get a whole lot of use and for sure, get your money's worth.
Mascara
Mascara is a category that I think you should primarily shop drugstore for. The drugstore has some really great ones and they cost half of what you'd pay at Sephora or Ulta. Also, mascara is a product that has a shorter lifespan ( you want to switch it out, at least, every six months), so spending less on it is better for your pocket. But, if you occasionally want to feel bougie ( I know I do haha), go ahead and get yourself the high-end product.
Lipstick
For lipstick, I'd say the same that I said for mascara, going drugstore is fine. I've tried a whole slew of lip products and when I bought high-end, it didn't feel dramatically different than what I had tried at the drugstore. If you are a girl that typically sticks to one or two lipsticks, splurging on a couple high-end products won't be a bad investment. But if you're like me and you want to have every color under the sun, go drugstore. You could also have a happy medium and have your "core colors" ( think a good neutral color and a staple red) which you buy high-end and then your fun colors (the fuschia you reach for only on occasion) that you buy drugstore.
Blush/Bronzer
When it comes to blush and bronzer, I am all across the board. Like lipstick, I like to have a whole color range to choose from, so I have a fair amount of both. As with eyeshadow, you can risk getting some chalky or unpigmented products from the drugstore, but for the most part, this isn't a regular thing. Also, you definitely don't have to spend a fortune to get a pigmented blush. For example, I've bought some wet n wild blushes for about $3 and they were super pigmented and easy to blend.
Brushes
If you've read my previous makeup posts, you'll know that I am a fan of drugstore brushes, especially if you are just starting out. Opting for something less expensive doesn't mean that you'll be compromising quality. Most of my most reached for brushes have been ones that I've picked up for a good price, and they are just as great as some of my more expensive brushes.
Powder/Highlight/Primer
I've grouped these together because honestly, I haven't tried enough to opt for one end or the other. For face powder, I've only tried a few high-end ones because I was using a drugstore one that I really liked for the longest time. I haven't tried a whole bunch of highlighters because I tend to have oily skin, so I stayed away from them for the longest time. The most recent ones that I've tried have been drugstore though and they work pretty well for me. I do know that there are some really great high-end ones, though. I haven't tried that many primers, but I do know that most of what I tried at the drugstore did not work for me at all. But, I have seen that a couple drugstore brands have released new ones that have gotten pretty decent reviews, so going drugstore is not entirely a lost cause.
I hope this helps you as you are making decisions on what beauty items to spend your money on, but as I always say, how you want to build your makeup collection is entirely up to you. You are the artist and you get to choose your materials. I hope you guys are having a great start to your week. I am thinking up of some topics that I want to post on here. It's been a challenge trying to balance between pre-med and non-premed related content (sorry to my non-premed people), but I'll try to fix that. Have a great day and I'll talk to you soon!
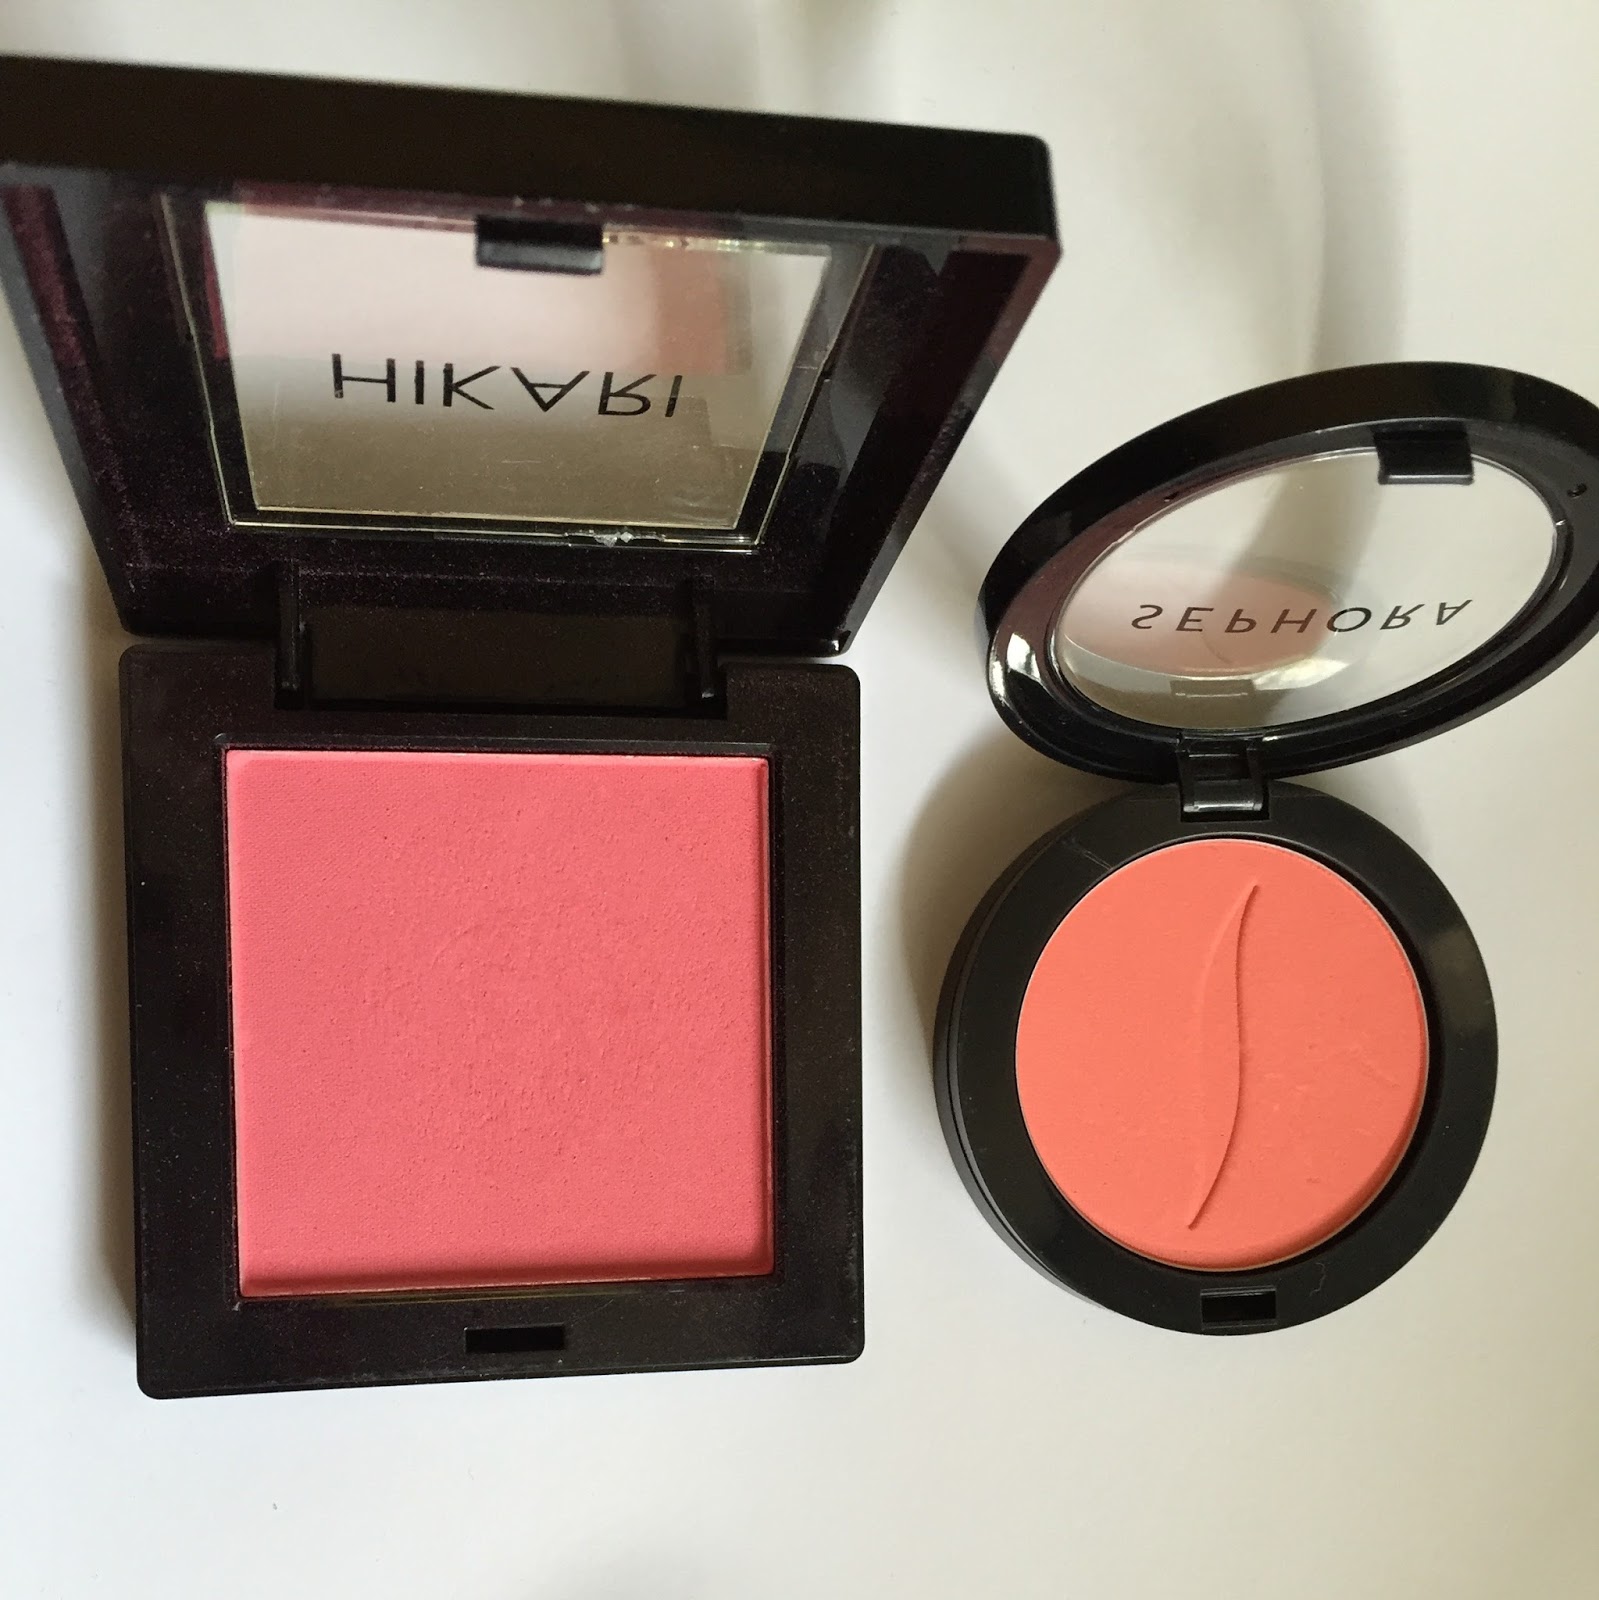
One of my favorite things to do every season is to switch out some of the products that I have in my makeup bag. Now that it has been feeling a lot like Spring, I thought it was the best time to do this.
Obviously, the best way to present this was to make a video so that I could better describe the products, but I'll put some pictures of the products below, so you can get a better look at what I show in the video.
Products Mentioned:
AG Hair Texture Kit
Powder Blushes
(L) Hikari blush in Tango (R) Sephora blush in Orange Pop
Cream Blushes
(L) MAC Casual Colour Lip and Cheek Colour in Relaxation (R) Bobbi Brown Pot Rouge in Pale Pink
Lip Products and Makeup Brush
Brush is the Contour Brush from the Real Techniques Core Collection Lipsticks: (Top) Rimmel Colour Rush in Lady Marmalade (Bottom) Revlon Colorburst Matte Balm in Showy
Bronzer
Tarte Bronzer in Park Ave Princess
Nail Polish
(L) OPI Nail Polish in "Do You Take Lei Away?" (R) OPI Nail Polish in "Rich Girls & Po-Boys"
Swatches
(L) Rimmel Colour Rush in Lady Marmalade (R) Revlon Colorburst in Showy
I’ve been meaning to make this post for
quite some time now as bra knowledge is an area that I would say I’m pretty
savvy in, so I figured Today’s post would be a great time to share that
knowledge. The first thing (and I would say most important) thing that I wanted
to address is how to check for a proper fit. I made a short video ( It’s the
video below) about what to look for when trying on bras, but I also want to
dedicate this post on elaborating on what I mentioned in the video.
Fit
The video above
focuses on the different areas that you should be checking for a proper fit:
Band, cups, breastbone, and straps. The
band is the most important place to check for fit, as it is responsible for around
ninety percent of your bra’s support. To also check the band, put the bra on
and raise your arms above your head. If your bra slides up when you raise your
arms, then the band is definitely too big.
The other ten percent
of your bra’s support comes from the support offered by your straps. As the
percentage the straps offer is minimal, it is not the most important part of
the bra. A manager I worked with actually made a comment that with a supportive
bra, you should be able to take off the straps and still feel supported by your
bra. While writing this post, I totally tried this and to my surprise, my bra
stayed in place and still felt pretty supportive. So, that was rather neat.
The cups should
fit smoothly on the top of the breast. If it is beginning to indent the breast
tissue, the cup is too small. If you have extra space in cup, the cup is too
big. Another thing to note is that if the underwire is poking you in the armpit,
then the cup might be too big. A proper fitting cup should encircle the breast
tissue, but stop comfortably at the side of the breast.
As I mentioned in the video, a proper fitting band should
feel snug, but still wearable. You should be able to fit at least a finger in
the band and have a little bit of give. I mentioned being able to fit two
fingers in the video, but one finger is actually best. For the straps, you
should be able to fit two fingers between the strap and your shoulder. Of
course, if your straps feel like they are sliding down, by all means tighten
them. The two-finger trick is just a general rule.
In summary, a proper
fitting bra should be smooth in the cup, have a snug yet supportive band,
comfortable straps, and a centerpiece that lies flat on the breastbone. The last
portion might not always be true though (I elaborate on that in the video). Overall for fit, the most important thing is
that you are comfortable. You are the one that will be wearing it, so make sure
it is something that you are happy with.
Sizing
For bras, the
sizing is broken up into two components: the band (number) and cup (letter).
The band measures the width of your rib cage, while the cup measures the amount
of space you need to fit your breast tissue. I like to think of these two
factors as separate entities as it makes it easier to understand sizing. It’s
funny because I vaguely remember a situation where a girl was bragging about
her bra size saying, “Yea, I’m a 38!” and it was comical because she thought
that meant she had big boobs, when in reality it just meant she had a wider rib cage.
To start with
sizing, I’d say it is super important to get measured because it will help you
get a better estimate as what band size you should be wearing. The band is
measured by the bra’s number and this number can range anywhere from a 30 to a
44 and increases in increments of 2 (ex: 30-32-34-36-etc.). You can also find
numbers outside of this range, but for the most part these are the most common
ones. For places to get sized, I recommend either Soma or Nordstrom’s. If you work at Victoria’s Secret, I am sorry,
but I’ve had so many people come in with the size VS measured them and it doesn’t
fit well. Just saying.
The bra’s cup is
represented by a letter. This typically ranges from A-G, but of course other
brands can have different lettering. For the cups, the most common would be: A,
B, C, D, DD, DDD, and G. Most brands don’t offer E’s or F’s, but some do. The A-DDD
is pretty standard lettering in the bra industry. Once you go past DDD, the
lettering can mean a whole different thing to each brand, so I’d be aware of that.
For most of us, this typically isn’t a problem we need to worry about as most
ladies tend to be in the lettering range I mentioned.
Putting the two
components together, you’ll end up with a number-letter combo (eg. 36D). The
most important part to remember though is if the bra is not fitting properly,
you’ll want to consider the two components separately. For example, if you try
on a 36D and it doesn’t fit right, note where it doesn’t fit. Is the breast
tissue spilling out of the cup but band feels okay? Try a bigger cup size but
keep the band the same (so, if you tried on a 36D, try on a 36DD). Does the
band feel uncomfortably tight? You’ll most likely have to go up a band size and
down a cup size. Why is this? Because when you go up a band size, the cup size
also gets a bit bigger. So, a 36D cup won’t be the same as a 38D cup. If when
you tried on the 36D the cup felt fine but the band felt too tight, I’d try on
a 38C next time to give you more space in the band but keep the cup the same.
If the band and the cup don’t fit, then you’ll have to change the size of the
cup and the band. So to illustrate, if you tried on a 36D and both the band and
the cup were too tight, try on a 38DD next. As you can see, sizing can be a
little complex, so you might need to play around with your letter-number combos
when trying bras on.
Remember, the size is just a size. It doesn’t have any
meaning behind it. So, if you are wearing a 32A or a 42G don’t get fixated on
the size. Just focus on whether or not the bra is doing what it’s supposed to
be doing, giving you support. I say this because I’ve had so many ladies come
in to try on bras and they’ll refuse to wear a certain size because they’re “not
a 38” or “a DDD sounds horrible”. If the 38 fits you well, wear the 38, end of
story.
Care
For care, the
most important thing to remember is that if you take care of your bras, they
will last you longer. The best way to care for your bras is to hand wash them
and hang them up to dry. The hand washing part you can be a bit lax on, as who
really has the time to do that. You can either wash them in a lingerie bag, or
if you have enough of them, wash them by themselves on gentle. What you can’t
be lax about is drying. Never (and I mean NEVER) put your bras in the dryer.
The heat degrades the fabric and destroys your bras. If you’ve had a situation
where the wire is popping out, you more than likely were drying it in the dryer
(Shame on you!). Always hang dry your
bras. I know when I was in college, I would hang them on the rod in my closet
to dry. It was super simple, and something you can do if you don’t have a
laundry line.
On average, bras last about 6 months. This number
will of course, depend on how often you wear and wash them. If you have one or
two bras that you wear every day, they might not make it to the 6 months. But,
if you have 4-5 that you rotate, you could make it 6 months and beyond,
depending on how well you take care of them. I have quite a few bras, so I’ve
had some of mine for at least two years and they still are in great condition.
I’ve obviously washed them many times and none of the wires are popping out, so
this is evidence that with proper care you can make them last. Ideally, I’d say
aim for at least 3 so you can rotate them, but obviously having more than that
is better.
Quality
Like any other article of clothing, bras are an investment. If you buy
yourself a good bra and take care of it, you can get it to last you a while. I
know the bras we sell at our boutique range from $44-$60 depending on the
style, but the fabric we use is really great, so paying the price tag is totally
worth the money. So, when you are out shopping, pay attention to what you are
purchasing, because more money doesn’t always necessarily mean better quality.
I know this was a lot of
information, but I am hoping it made sense. As always, if you have any
questions, do not hesitate to leave a comment. I love getting feedback about my
posts and also offering what I know. I hope you guys had a great week and stay
posted for what I have coming next week. Next Thursday, I have my monthly
recap, and that one is always really fun, especially if you want to know what I’ve
been up to. Have a really great weekend and I’ll talk to you soon!
Today's post is going to veer in a different direction from my typical posts, but as someone who is a beauty lover, you can expect quite a few beauty related posts on this blog. Today's focus, Hair.
Now, for some reason, I feel that this year I have developed an awesome relationship with my hair. A lot of this does have to do with the fact that my sister is a hairstylist and helps me keep my hair healthy. But, I would also say that I've been more conscious about what I do to my hair to maintain it. As I feel that my system is going pretty well, I wanted to share what I do with you guys.
Current hair situation. My sister recently re-toned it with an ashy undertone.
My Hair
If you've been following my blog, you probably remember me mentioning that I've been more daring. Well, my hair definitely was part of that as 2015 was the first time that I had ever colored my hair. I was partly inspired by the need to be daring and also by the fact that my sister dyed her hair green ( Sounds weird, but she pulls it off really well!). I was falling behind on the daring, so I decided to take the leap and try something new. Now, don't get me wrong. I LOVED my natural hair color, and that was the main reason that I had refrained from coloring my hair, but with all the pretty hair coloring I'd seen on Instagram and Pinterest, I was ready to try it myself. So, in October, we decided to go for a copper-brown balayage ( mine turned out slightly more on the highlight side initially, but it has grown into more of a balayage). Not going to lie, at first, I felt odd and unsure about my hair, but after a couple weeks and loads of compliments, I really loved it. When my sister dyed my hair, she also did a keratin treatment making my hair super soft which definitely added to my hair love. After a couple months, the initial color had faded out and it started to look like the picture below, which I did really like, but as it is winter, we re-toned it with a more ashy tone ( seen in the picture above) instead of a copper undertone.
My previous hair color with copper undertones.
Taking Care of Your Hair
Since I do have long, color-treated hair, your routine might differ from mine, but I do still believe that some of these tips can work well for anyone.
1.) Get your hair cut regularly: I try to get mine cut every 6-8 weeks, but then again not everyone has a hairstylist sister, so I'd say aim for at least every 3 months if you are growing it out so that it can grow healthy. You really want to try to prevent split ends and getting it cut regularly will ensure that your ends remain fresh and free from breakage.
2.) Don't wash it every day:
For someone with long hair, it has always been a given that I shouldn't wash my hair every day as it really dries out my ends, but now that I have color-treated hair it is super essential not to. I would say that now I wash my hair every third day. I did previously have oily hair but over time, I feel that my hair has gotten used to being washed less. For the days that it does happen to look a little greasy and I don't want to wash it, I used a dry shampoo to freshen it up until it's time to wash it again.
The dry shampoo currently in my rotation. It's a pretty inexpensive drugstore one and this particular scent is lovely.
3.) Be aware of your products:
I would say that this was definitely a big one for me and also a game changer for my hair. As soon as my sister learned about hair products in beauty school, the hair products I was allowed to purchase from the drugstore became very limited. A majority of the drugstore shampoos contain sulfates and parabens which can strip your hair of its natural oils and make it less manageable. When I switched over to products that had limited or no amounts of these agents, I could really tell the difference. Initially, I was using a volumizing line from the Sebastian brand that I really loved, but when I switched over to a Lush Shampoo bar for oily hair ( this is the one I was using), I noticed my hair wasn't getting as oily as it previously would. I used the shampoo bar until I got the keratin treatment ( The shampoo bar still has some sulfate in it, but nowhere near as many as regular shampoos and it doesn't have any parabens.) and I had to remove all sulfates from my products. Currently, I use R+co products, mainly because they sell them at the salon where my sister works, but also because they are keratin safe. I LOVE these products, not only do they make my hair feel awesome, but they smell sooooo good. It's safe to same I'm addicted lol. They are a tad bit on the pricey side ( I'm lucky and my sister gets them at a discount), but I'd say they are totally worth it if you want your hair looking pretty.
R+co products! I am currently using the Gemstone shampoo Dallas Conditioner, and Tinsel hair oil for my ends.
4.) Less heat:
I'm pretty sure you've probably heard this one everywhere, but I am going to say it again. Too much heat can damage your ends. I will definitely reach for my straightener or curling iron every so often, but I reserve my blow dryer for only when I really really need it (i.e. I just showered before going out and I need to get myself put together quickly). For me, it probably wouldn't be super bad as I don't wash it super often, but I still want to keep damage at a minimum so I let my hair air dry whenever possible.
That's pretty much all that I have been doing and my hair has been really soft and healthy, even after being color treated. I hope my tips were helpful and that you guys are having a great start to your week!